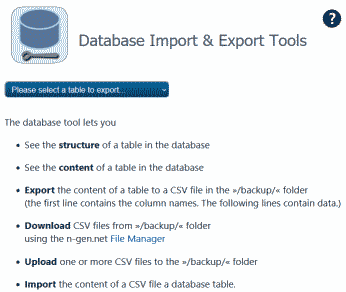
How to use the n-gen.net CMS built-in Database Tool.
Secure your data (Export)
The n-gen.net CMS Database Tool (DB tool) can be accessed from the back side of the Admin Cube or from the Admin Ribbon (right most) gear icon => Tools, Database => DB table import + export.
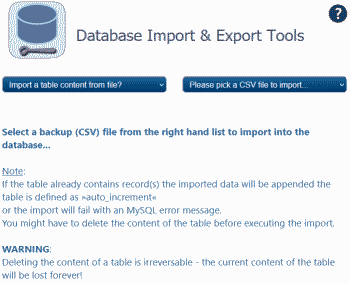
When you open the DB tool the page will look like this:
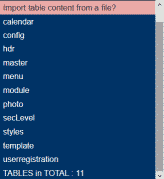
When you click on the drop down list you see a pink line with the text "Import table content from a file?", a number of lines each with a table name and on the bottom of the drop down list you can see the total number of tables in your database.
Note: If you have deleted any tables from your database only the names of the current tables are displayed in the drop down list. In the same way; if you have added a custom table to your database it will also be displayed as the Database Tool actually queries the your database about which tables are present.
After selecting the »secLevel« table - the table that contains the system's security levels - to export you will be redirected to this window:
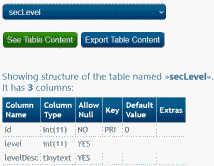
In this window you see:
- the drop down list containing the table names,
- a green button labeled "See Table Content",
- a blue button labeled "Export Table Content",
- a text that informs you the number of columns in the table,
- a matrix that shows you:
- The column name,
- The column type
- Whether the column allows Null - values or not,
- If the column is primary key of the table,
- If the column has a default value and
- If there are any Extras to the column.
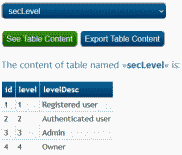
When clicking the green button labeled »See Table Content« you will be presented to the raw content of the DB table where the blue top contains the column names and each following row shows a record in the database like this:
When clicking the blue button labeled »Export Table Content« you export both the column names and all the records of the table to a text file in CSV-format.
The name of that CSV file is [table_name].csv, i.e. secLevel.csv
The structure of that CSV-file is that the first line of text contains the column names separated by "," (commas) and the following lines contain all the records of the table - each value starting and ending with " ' " (single quote) as text delimiter and separated by "," (commas).
| id |
level |
levelDesc |
| 1 |
1 |
Registered user |
| 2 |
2 |
Authenticated user |
| 3 |
3 |
Admin |
| 4 |
4 |
Owner |
Above: The content of the »secLevel« table in the database
id,level,levelDesc
'1','1','Registered user'
'2','2','Authenticated user'
'3','3','Admin'
'4','4','Owner' |
Above: The content of the »secLevel« table after export to a CSV-file (secLevel.csv)
As you can see the content is exactly the same: The first line in the CSV-file resembles the column names in the database table and the following lines the values but instead of the table borders the values are surrounded by " ' " and separated by "," (commas).
After you have exported the content of a DB table to a CSV file you see this confirmation:
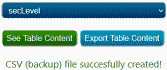
Now the CSV-file (secLevel.csv) is saved in the /backup/ folder and can be handled as any other (text/CSV) file: You can read it, modify it and download it. Actually you should download it! It does not make much sense to have the backup CSV-file on the same web server that holds the connection to your database: If your web server is hacked or crashes or some other misfortune happens tp your website the database and all our online files might be lost. And then also all the backup files with it. That is why you should export the DB tables and download the CSV-files to an offline media when you have made changes to your database that your are not ready to do all over again!
How does the Import Feature work?
To import data from a CSV-file is quite straight forward but the CSV-file must follow a number of rules:
-
The name of the CSV-file must reflect the table name
(if you have performed an export more than one time of each table and have not deleted the files from the /backup/ folder an older version of the backup file exists in the /backup/ folder. The second time you export a table the old CSV-file is renamed with the date of the new export. I.e. the second time you export the table »secLevel« the old secLeve.csv file is renamed »upd[YYYY-MM-dd]_secLevel.csv« Only two copies of the table content will be saved. If you export more than twice you must either delete the previous CSV-file or it will be overwritten with the newer data. The Import Feature automatically recognizes the backup file name so you can also import an older CSV-file)
-
The first line in the CSV-file must contain the column names separated by "," (commas),
-
The following lines must be containing a record in each line and the field values must be enclosed in " ' " (Single Quote) and separated by "," (commas),
To import the content from CSV-file into a database table the import feature needs to know the following:
- Which table the data should be inserted into,
- What columns (column names) are contained in the the table,
- What values should be inserted into each row / record.
How does the import feature find that information? The Import feature reads the CSV-file: First it reads the file name and from that extract the table name in which the data should be imported to. Then it reads the first line that contains the column names. Then it reads the values line by line to create the SQL insert record statement. Finally it fires the SQL statement against the database and the records are restored one by one.
Restore your data (Import)
On the Database Tool opening page select the pink line in the drop down box "Import table content from a file?" to open the import dialog, see below:
In the left drop down list the CSV-files are listed. Above the CSV-files found in the /backup/ folder you see two green selectable lines:
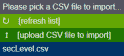
Selecting the top green line simply refreshes the list (convenient if you have uploaded CSV-files with the FileManager while the Db Tool is open). The second green line, "[Upload CSV-file to be imported]" let you upload CSV-files to your /backup/ folder for import - now or later. Remember they must follow these rules.
When you have imported the relevant CSV-files and they appear in the dropdown list simply select one of the to read the file values and import it into the corresponding database table:
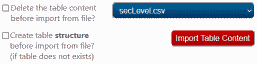
Notice that if the table has auto_increment in the "Extras" column you can append your CSV-file data to a table with existing content. If the table has no auto_increment and the table contains records with the same IDs as the CSV-file that you import from you will receive a "Duplicate Entry" error. To solve this issue the you must delete the table content before importing from the CSV-file.
| Table Name |
Data can be appended without deleting data prior to import.
(The tables has »auto_increment«) |
Duplicate data must be deleted prior to import.
(The tables has no »auto_increment«) |
| calendar |
 |
 |
| category |
|
|
| config |
|
|
| dbConTest |
|
|
| hdr |
|
|
| master |
|
|
| menu |
|
|
| module |
|
|
| photo |
|
|
| secLevel |
|
|
| styles |
|
|
| templates |
|
|
| userregistration |
|
|
| |
|
|
WARNING: If you delete content from a table it cannot be undone!
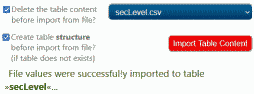
After successful import you see this result:
If you check the box "Create table structure..." the table will automatically be created before the actual data import. If the table already exists the table structure will not be affected by checking the box "Create table structure..." The feature only makes sense in case the table is missing from your database. It does not support custom tables so if you have created a custom table in one n-gen.net CMS and want to export the content to another n-gen.net CMS the table structure must be created manually before the data import.
 Just one final piece of advice: Even though the MySQL RDBMS and databases in general are pretty robust you should remember to export tables when you have made major changes to your website's configuration, layout or content - and you should remember to download the exported tables (the CSV-files) to an offline media such as an external harddisk or a USB-drive and store the media in a safe place.
")